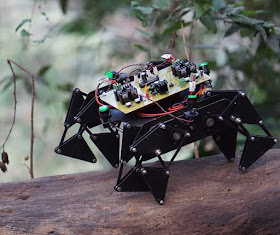
Building an 8-legged spider robot is a complex and challenging project that requires expertise in robotics, electronics, and programming. Below is a high-level step-by-step guide to help you get started. Keep in mind that this is a general outline, and you will need to conduct further research and learning to complete the project successfully.
 |
| How to Build 8 Leg Spider Robot? Step by Step |
Step 1: Research and Planning
Understand the basic principles of robotics and kinematics. Study existing spider robot designs and projects to get an idea of the challenges and solutions. Decide on the size, materials, and specific features you want for your spider robot.
Step 2: Components and Materials
Create a list of components you'll need, such as motors, sensors, microcontrollers, batteries, and structural materials.
Choose the appropriate type and size of servomotors or actuators for each leg. High-torque servos are usually preferred for robust movement.
Step 3: Mechanical Design
Design the overall body and leg structure of the spider robot using CAD software. Ensure that the legs are arranged in an appropriate configuration to achieve stable and balanced movement. Print or fabricate the mechanical parts using 3D printing, CNC machining, or other suitable methods.
Step 4: Electronic Assembly
Connect the chosen servomotors to the legs as per the design. Assemble the electronic components on a custom PCB or a breadboard, including the microcontroller, motor drivers, and sensors.
Step 5: Sensor Integration
Integrate various sensors like ultrasonic distance sensors or infrared sensors to help the robot detect obstacles and adjust its movement accordingly.
Step 6: Programming
Choose a suitable programming language (e.g., Arduino IDE using C/C++ or Python) and program the microcontroller to control the movements of the spider robot. Implement inverse kinematics algorithms to calculate the angles and positions of each leg for smooth walking.
Step 7: Testing and Debugging
Test each leg's movement and sensor readings individually. Debug any issues with the hardware or software.
Step 8: Power Supply
Choose a suitable power source, such as rechargeable batteries, to power the robot. Make sure the power supply is sufficient to drive all the motors and electronic components.
Step 9: Fine-tuning and Calibration
Fine-tune the robot's gait and movements to achieve stability and smooth walking. Calibrate the sensors to ensure accurate readings and response to the environment.
Step 10: Enclosure and Aesthetics
Design and build an outer casing or enclosure for the spider robot if desired. Add aesthetic features to give your robot a spider-like appearance.
Step 11: Safety Considerations
Implement safety features to prevent the robot from causing harm or damage during operation.
Step 12: Documentation and Sharing
Document your project with detailed instructions, schematics, and code for others to learn from and replicate.Share your project on robotics forums or social media to get feedback and inspire others.
Remember that building a complex robot like an 8-legged spider robot requires knowledge in various fields, including mechanical engineering, electronics, and programming. Take your time, do thorough research, and be prepared to face challenges along the way.


0 comments:
Post a Comment